Конец июня 2017 года запомнился IT сообществу по массовому заражению множества крупнейших компаний и госучреждений России, Украины и других стран новым вирусом-шифровальщиком Petya (NotPetya). В большинстве случаев, после проникновения внутрь корпоративной сети, Petya молниеносно распространялся по всем компьютерам и серверам домена, парализуя до 70-100% всей Windows-инфраструктуры. И хотя, одним из методов распространения Пети между компьютерами сети было использование эксплоита EternalBlue (как и в случае с WannaCry), это был не основной канал распространения вымогателя. В отличии от WCry, который распространялся исключительно благодаря уязвимости в SMBv1, NotPetya были изначально заточен под корпоративные сети. После заражения системы, шифровальщик с помощью общедоступной утилиты Mimikatz, получал учетные данные (пароли, хэши) пользователей компьютера и использовал их для дальнейшего распространения по сети с помощью WMI и PsExec, вплоть до полного контроля над доменом. Соответственно, для защиты всех систем не достаточно было установить обновление MS17-010.
Continue reading “Методы защиты от mimikatz в домене Windows”
Tag: windows
Windows: Чистим контекстное меню
Microsoft added new entries to the File Explorer context menu in Windows 10 that some users of the operating system may like, and others may call bloat.
If you right-click on files in the most recent release build of Windows 10, the Creators Update, you get up to three additional context menu items.
You may get “Edit with Paint 3D” to edit an image with the built-in Paint 3D application, a “Cast to Device” entry to cast the media file to another device, and the “Share” entry which opens the Share UI of Windows 10 when selected.
Windows 10 Insider systems feature an “Edit with Photos” entry on top of that. That’s three edit options for images on Windows 10 in the context menu without any option to disable these entries.
Note: I recommend that you create a backup of the Registry before you make any changes to it. This allows you to restore the state before any editing. You can use a program like Erunt or RegBak for that, or with a right-click on any key (those on the left side) that is linked to adding, changing, or deleting values or entries, and selecting export.
Remove Windows 10 Context Menu bloat

Edit with Paint 3D
Paint 3D was included in the Windows 10 Creators Update. It is a modernized version of the classic Paint application that comes with a new UI, as an application, and ships with new features such as 3D functionality.
There is only one situation where the “Edit with Paint 3D” entry in the context menu makes sense: when you use a different default image editor for editing, but use Paint 3D sometimes for editing jobs. Even then it is possible to use “open with” instead to open the image in Paint 3D.
One issue that you will encounter when it comes to the removal of the context menu entry is that it is mapped to different file extensions, and that you need to remove Registry keys for each file extension individually to remove Paint 3D completely from the context menu.
To remove Edit with Paint 3D, do the following
- Tap on the Windows-key on the computer keyboard, type regedit.exe and tap on the Enter-key to open the Windows Registry Editor.
- Confirm the UAC prompt.
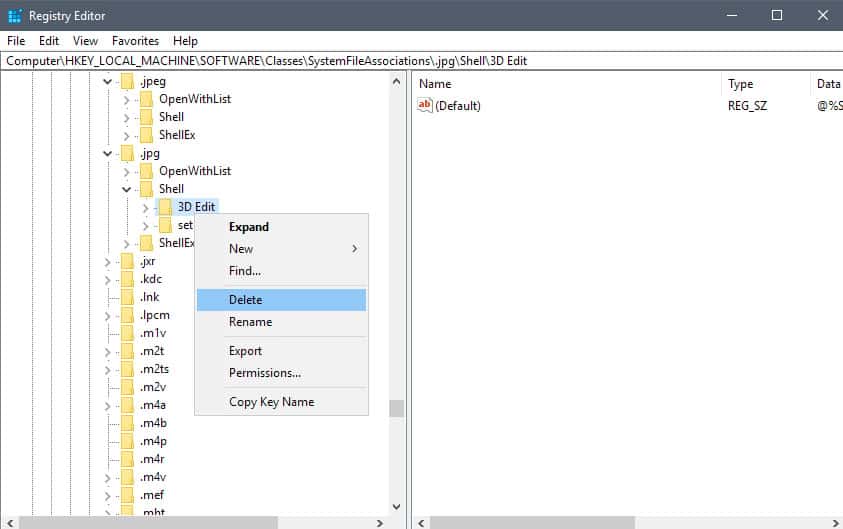
- Go to HKEY_LOCAL_MACHINE\SOFTWARE\Classes\SystemFileAssociations\.bmp\Shell
- Right-click on 3D Edit, and select Delete.
- Go to HKEY_LOCAL_MACHINE\SOFTWARE\Classes\SystemFileAssociations\.gif\Shell
- Right-click on 3D Edit, and select Delete.
- Go to HKEY_LOCAL_MACHINE\SOFTWARE\Classes\SystemFileAssociations\.jpg\Shell
- Right-click on 3D Edit, and select Delete.
- Go to HKEY_LOCAL_MACHINE\SOFTWARE\Classes\SystemFileAssociations\.jpeg\Shell
- Right-click on 3D Edit, and select Delete.
- Go to HKEY_LOCAL_MACHINE\SOFTWARE\Classes\SystemFileAssociations\.png\Shell
- Right-click on 3D Edit, and select Delete.
- If you notice the “Edit with Paint 3D” entry next to any other image type, repeat the process outlined above for it. All you need to do is go to HKEY_LOCAL_MACHINE\SOFTWARE\Classes\SystemFileAssociations\, click on the image file type, then on Shell to delete the 3D Edit value.
Edit with Photos
Edit with Photos is a new context menu option that is not part of the Creators Update version of Windows 10. It shows up in the latest Windows 10 Insider Builds that showcase features that will likely be part of the Fall Creators Update out later this year.
Read also: KB4015552, KB4015553 April Previews for Windows 7 and 8.1
If you don’t use the Photos application to edit images on Windows 10, you may want to remove the entry from the File Explorer context menu.
To remove Edit with Photos, do the following
- Tap on the Windows-key on the computer keyboard, type regedit.exe and tap on the Enter-key to open the Windows Registry Editor.
- Confirm the UAC prompt.
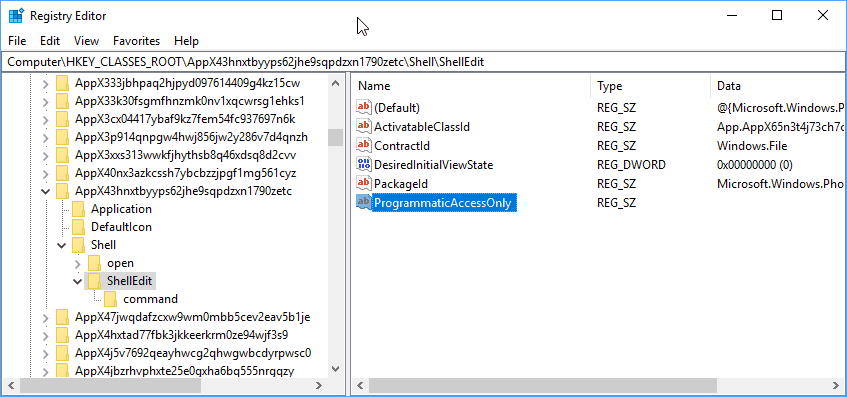
- Go to HKEY_CLASSES_ROOT\AppX43hnxtbyyps62jhe9sqpdzxn1790zetc\Shell\ShellEdit
- Right-click on ShellEdit, and select New > String value.
- Name it ProgrammaticAccessOnly.
Cast to Device
If you don’t use the casting functionality of Windows 10, you have no need for the Cast to Device entry in the File Explorer context menu.
Basically, what it allows you to do is stream media files to devices that support Miracast or DLNA.
To remove Cast to Device, do the following
- Tap on the Windows-key on the computer keyboard, type regedit.exe and tap on the Enter-key to open the Windows Registry Editor.
- Confirm the UAC prompt.
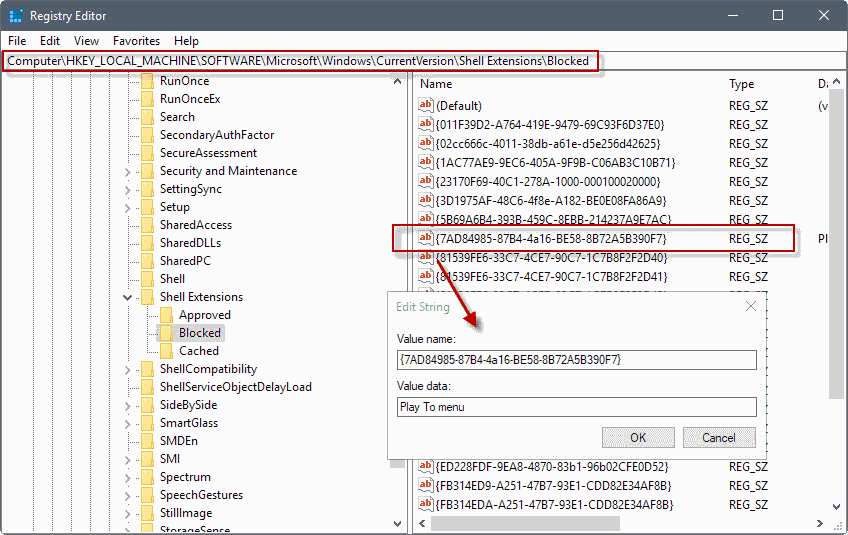
- Go to HKEY_LOCAL_MACHINE\SOFTWARE\Microsoft\Windows\CurrentVersion\Shell Extensions
- If there is no Blocked key under Shell Extensions, right-click on Shell Extensions and select New > Key. Name the key Blocked.
- Right-click on Blocked, and select New > String Value.
- Name it {7AD84985-87B4-4a16-BE58-8B72A5B390F7}
- Double-click on the newly created String value, and change the Value data field to Play to menu.
- The change takes effect when you log out and on, restart the PC, or restart the Windows Explorer process.
Tip: To restore the “Cast to Device” entry in the Windows 10 context menu, go to the Blocked key in the Registry, right-click on {7AD84985-87B4-4a16-BE58-8B72A5B390F7} and select delete from the menu that opens.
Share
Share may not be active on all systems by default. It is on by default in recent Windows 10 Insider Builds. You may use it to share files using the built-in Windows 10 share functionality.
To remove Share, do the following
- Tap on the Windows-key on the computer keyboard, type regedit.exe and tap on the Enter-key to open the Windows Registry Editor.
- Confirm the UAC prompt.
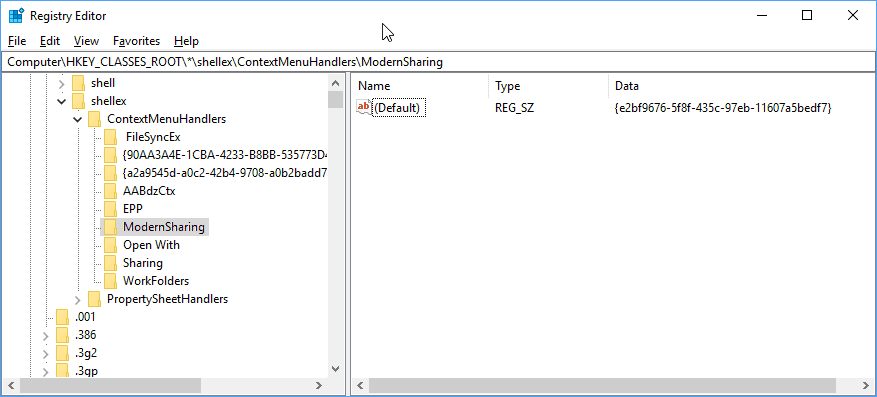
- Go to HKEY_Classes_ROOT\*\shellex\ContextMenuHandlers\
- Right-click on Modern Sharing, and select Delete from the context menu.
Отключение SMB 1.0 на стороне клиента
Отключение SMB 1.0 на стороне клиента
Отключив SMB 1.0 на стороне сервера, мы добились того, что клиенты не смогут подключаться к нему по этому протоколу. Однако, они могут использовать устаревший протокол для доступа к сторонним (в том числе внешним) ресурсам. Чтобы отключить поддержку SMB v1 на стороне клиента, выполните команды:
sc.exe config lanmanworkstation depend= bowser/mrxsmb20/nsi
sc.exe config mrxsmb10 start= disabled

Итак, отключив поддержку устаревшего SMB 1.0 на стороне клиентов и серверов вы полостью защитите свою сеть от всех известных и пока не найденных уязвимостей в нем. А уязвимости в Microsoft Server Message Block 1.0 находят довольно регулярно. Последняя существенная уязвимость в SMBv1, позволяющая злоумышленнику удаленно выполнить произвольный код, была исправлена в марте 2017 года.
Отключение SMB 1.0 на стороне сервера
Отключение SMB 1.0 на стороне сервера
Протокол SMB 1.0 может быть отключен как на стороне клиента, так и на стороне сервера. На стороне сервера протокол SMB 1.0 обеспечивает доступ к сетевым папкам SMB (файловым шарам) по сети, а на стороне клиента – нужен для подключения к таким ресурсам.
С помощью следующей команды PowerShell проверим включен ли протокол SMB1 на стороне сервера:
Get-SmbServerConfiguration

Как вы видите, значение переменной EnableSMB1Protocol = True.
Итак, отключим поддержку данного протокола:
Set-SmbServerConfiguration -EnableSMB1Protocol $false -Force
И с помощью командлета Get-SmbServerConfiguration убедимся, что протокол SMB1 теперь выключен.

Чтобы полностью удалить драйвер, обрабатывающий доступ клиентов по протоколу SMB v1, выполните следующую команду:
Disable-WindowsOptionalFeature -Online -FeatureName SMB1Protocol -Remove
Осталось перезагрузить систему и убедиться, что поддержка протокола SMB1 полностью отключена.
Get-WindowsOptionalFeature –Online -FeatureName SMB1Protocol

Отключение SMBv1
Совет. Прямые ссылки на патчи для исправления уязвимости под снятые с поддержки системы:
Windows XP SP3 x86 RUS — http://download.windowsupdate.com/d/csa/csa/secu/2017/02/windowsxp-kb4012598-x86-custom-rus_84397f9eeea668b975c0c2cf9aaf0e2312f50077.exe
Windows XP SP3 x86 ENU — http://download.windowsupdate.com/d/csa/csa/secu/2017/02/windowsxp-kb4012598-x86-custom-enu_eceb7d5023bbb23c0dc633e46b9c2f14fa6ee9dd.exe
Windows XP SP2 x64 RUS — http://download.windowsupdate.com/d/csa/csa/secu/2017/02/windowsserver2003-kb4012598-x64-custom-enu_f24d8723f246145524b9030e4752c96430981211.exe
Windows XP SP2 x64 ENU — http://download.windowsupdate.com/d/csa/csa/secu/2017/02/windowsserver2003-kb4012598-x64-custom-enu_f24d8723f246145524b9030e4752c96430981211.exe
Windows Server 2003 x86 RUS — http://download.windowsupdate.com/c/csa/csa/secu/2017/02/windowsserver2003-kb4012598-x86-custom-rus_62e38676306f9df089edaeec8924a6fdb68ec294.exe
Windows Server 2003 x86 ENU — http://download.windowsupdate.com/c/csa/csa/secu/2017/02/windowsserver2003-kb4012598-x86-custom-enu_f617caf6e7ee6f43abe4b386cb1d26b3318693cf.exe
Windows Server 2003 x64 RUS – http://download.windowsupdate.com/c/csa/csa/secu/2017/02/windowsserver2003-kb4012598-x64-custom-rus_6efd5e111cbfe2f9e10651354c0118517cee4c5e.exe
Windows Server 2003 x64 ENU — http://download.windowsupdate.com/d/csa/csa/secu/2017/02/windowsserver2003-kb4012598-x64-custom-enu_f24d8723f246145524b9030e4752c96430981211.exe
Windows 8 x86 — http://download.windowsupdate.com/c/msdownload/update/software/secu/2017/05/windows8-rt-kb4012598-x86_a0f1c953a24dd042acc540c59b339f55fb18f594.msu
Windows 8 x64 — http://download.windowsupdate.com/c/msdownload/update/software/secu/2017/05/windows8-rt-kb4012598-x64_f05841d2e94197c2dca4457f1b895e8f632b7f8e.msu
Отключение SMB v 1.0
Простым и действенным способом защиты от уязвимости является полное отключение протокола SMB 1.0 на клиентах и серверах. В том случае, если в вашей сети не осталось компьютеров с Windows XP или Windows Server 2003, это можно выполнить с помощью команды
dism /online /norestart /disable-feature /featurename:SMB1Protocol
для Win 8 в PowerShell:
Set-SmbServerConfiguration -EnableSMB1Protocol $false
для Win 7.
Set-ItemProperty -Path “HKLM:\SYSTEM\CurrentControlSet\Services\LanmanServer\Parameters” SMB1 -Type DWORD -Value 0 -Force